
本文已获得原作者(Valentin Kiselev、Travis Turner)和 Evil Martians 授权许可进行翻译。原文讲述了配置 Lefthook 的五种很棒且令人惊讶的方法技巧,以及所带来的团队项目自动化的乐趣。
- 原文链接:5 cool (and surprising) ways to configure Lefthook for automation joy
- 作者:Valentin Kiselev、Travis Turner
- 站点:Evil Martians ——位于纽约和俄罗斯的 Ruby on Rails 开发者博客。 它发布了许多优秀的文章,并且是不少 gem 的赞助商。
【正文如下】
引言
Lefthook 已经持续开发 4 年多了。
虽然起初它只是一个在 Git hook 上调用自定义脚本的包装器,但随着时间的推移,Lefthook 已经发展成为一种工具,它提供了一种干净灵活的方式来自动化你的日常开发,无论是以明确的方式还是出奇的方式,尽皆如此。想知道更多吗?
在本文中,你将看到实际项目中使用 Lefthook 配置的范例。
Linting, formatting, and fixing typos
对涉及改动的文件运行 linter 和 formatter 是使用 Lefthook 的最常见方式。
例如,我有一个 Go CLI 项目,我将 Markdown 格式的文档存储在代码库中。每当我修复错误或实现功能时,我都需要测试和修改代码,并执行拼写检查,以免使读者感到困惑。
此外,文档中的所有链接都必须指向现有页面。无论我选择哪种工具,我都希望它们在每次我提交某些内容时都能运行。
让我们看一下 Lefthook 配置,它快速涵盖了上述所有内容,并且只需 20 行 YAML:
1
2
3
4
5
6
7
8
9
10
11
12
13
14
15
16
17
18
# lefthook.yml

pre-commit:
  parallel: true
  commands:
    lint:
      glob: "*.go"
      run: golangci-lint run --fix
      stage_fixed: true
    fix-typos:
      run: typos --write-changes {staged_files}
      stage_fixed: true
    test:
      glob: "*.go"
      run: go test -cpu 24 -race -count=1 -timeout=30s ./...
    links:
      glob: "*.md"
      run: lychee {staged_files}
每次提交内容时,linter、typo checker 和 link checker 都会并行运行。请注意, stage_fixed: true 它会在 git add 时自动对 pre-commit 中所改动的文件执行。值得一提的是,Lefthook 只尊重暂存的变更文件,因此未暂存的改动在执行 git commit 后将保持不变。
Monorepo
这是另一个示例:我的代码库中有两个文件夹: client 和 server。client 是用 TypeScript 编写的 SPA, server 是 Ruby on Rails 应用。我想对两者都执行 linting,并在推送更改之前运行客户端测试,因为这可以足够快地完成,而且我也不想在粗心的 CI 错误上浪费时间。
为此,我可以使用 root 选项让 Lefthook 在子文件夹中运行特定命令:
1
2
3
4
5
6
7
8
9
10
11
12
13
14
15
16
17
18
19
20
21
22
# lefthook.yml

pre-commit:
  parallel: true
  commands:
    server-lint:
      root: "server/"
      glob: "*.rb"
      run: bundle exec rubocop -A --force-exclusion {staged_files}
      stage_fixed: true
    client-lint:
      root: "client/"
      glob: "*.{ts,tsx}"
      run: yarn format {staged_files}
      stage_fixed: true

pre-push:
  commands:
    client-tests:
      root: "client/"
      glob: "*.{ts,tsx}"
      run: yarn test
root 和 glob 选项用作过滤器,因此如果你在 server 目录提交某些内容, client-lint 则将被跳过,反之亦然。
请确保你的 Gemfile 位于 server/ 中, 并且 package.json 位于 client/ 中。
Interactive hooks
没有必要浪费额外的时间去考虑提交消息的格式,或在团队中强制推行某种风格,因为有众所周知的工具可以做到这一点:Commitzen 和 commitlint。而使用 Lefthook 我们可以节省更多时间。以下是如何使用它来配置这些:
(查看完整示例)
1
2
3
4
5
6
7
8
9
10
11
12
13
14
15
16
# lefthook.yml

# Build commit messages interactively.
prepare-commit-msg:
  commands:
    commitzen:
      interactive: true
      run: yarn run cz
      env:
        LEFTHOOK: 0

# Validate commit messages; can be used with or without cz.
commit-msg:
  commands:
    "lint commit message":
      run: yarn run commitlint --edit {1}
该 interactive: true 选项将命令的 STDIN 与你的 TTY 绑定, 并允许你在每个 git commit 中与cz进行交互.(使用此配置时,开发者必须始终从终端提交,这可能会带来不便。)不过,你可以使用 commitlint 来验证提交消息是否合法。
prepare-commit-msg 也可建议作为 lefthook-local.yml 配置的可选 hook。
Implementing a CI-like pipeline
从 Git 拉取新提交时,自动运行新 migration 并安装依赖项会是一个好的做法,在 post-merge hook 中执行此操作是恰当的。
但有两件事需要考虑:
- 在运行 migration 之前,我必须安装后端依赖项;
- 我想与其他步骤并行来安装 client 的依赖项
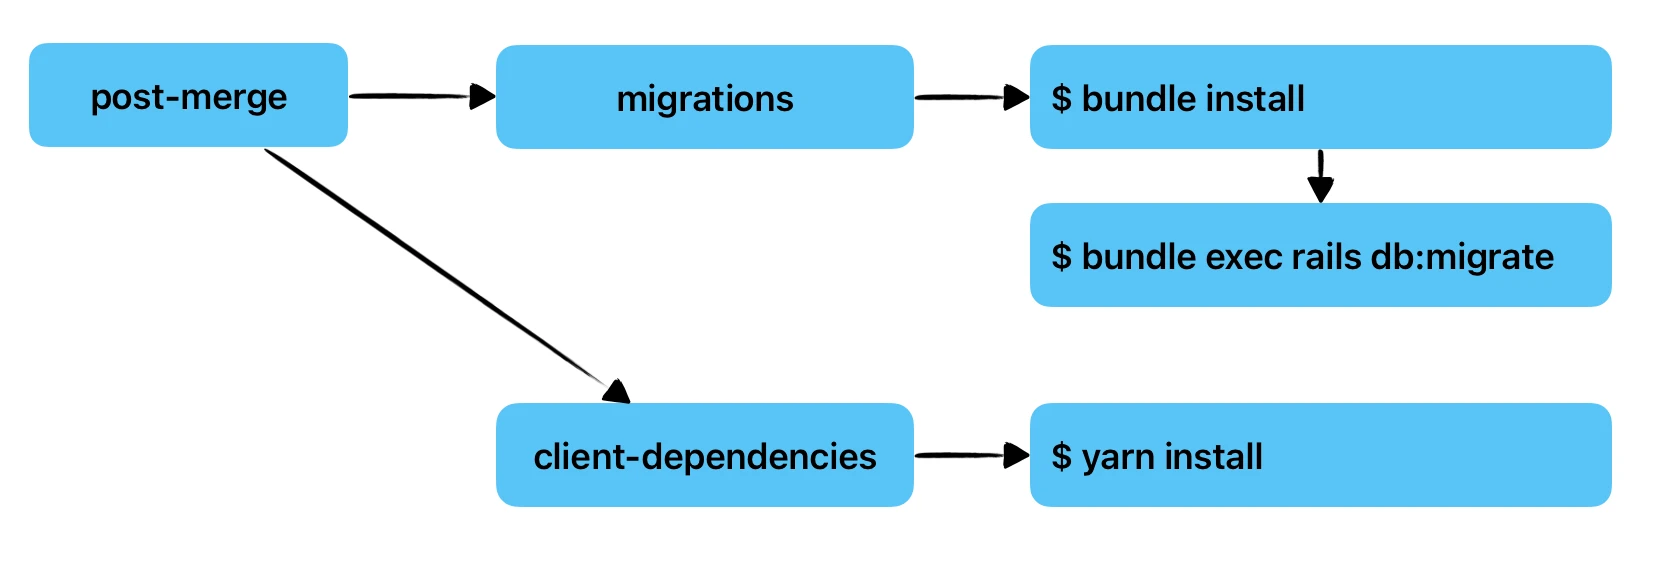
为实现这一点,让我们使用 helper hook:
1
2
3
4
5
6
7
8
9
10
11
12
13
14
15
16
17
18
19
20
21
22
23
24
25
26
27
28
29
30
# lefthook.yml

post-merge:
  parallel: true
  files: "git diff-tree -r --name-only --no-commit-id ORIG_HEAD HEAD"
  only:
    - ref: "main"
  skip:
    - rebase
  commands:
    migrations:
      run: lefthook run migrations
      env:
        LEFTHOOK_QUIET: execution_info,meta,skips,summary
    client-dependencies:
      glob: "{yarn.lock,package.json}"
      run: yarn install

migrations:
  piped: true
  files: "git diff-tree -r --name-only --no-commit-id ORIG_HEAD HEAD"
  commands:
    bundle:
      priority: 1
      glob: "Gemfile*"
      run: bundle install
    migrate:
      priority: 2
      glob: "db/migrations/*"
      run: bundle exec rails db:migrate
Globs 允许我们跳过不需要的步骤,而 migrations helper 允许我们通过管道传递 2 个命令。它们将一个接一个地运行,如果 bundle 失败, migrate 它们将不会启动。而files 是获取新文件,并将它们应用于每个命令以进行隐式筛选。
Shared configs
如果你厌倦了在每个代码库中都配置相同的样板 lefthook.yml 怎么办?我有数百个 Ruby 项目、大量 JavaScript 项目和一些 Go 微服务,我想在一个地方控制所有 hook,同时只提交一次更改。
当然!Lefthook 可以通过 remote 来做到!
首先,我为每种项目类型提供了 3 种配置,我将把它们存储在一个代码库中。让我们把它命名为 github.com/organization/lefthook-configs ,这 3 个文件如下:
1
2
3
├── lefthook-golang.yml
├── lefthook-js.yml
└── lefthook-ruby.yml
每个配置文件都有用于 linting、formatting、tests 等 pre-commit 的 hook:
1
2
3
4
5
6
7
8
# lefthook-golang.yml

pre-commit:
  commands:
    lint:
      glob: "*.go"
      run: golangci-lint run --fix
      stage_fixed: true
现在,在每个 Go 代码库中,你需要添加以下配置:
1
2
3
4
5
# lefthook.yml

remote:
  git: https://github.com/organization/lefthook-configs
  config: lefthook-golang.yml
大功告成!当你更改 lefthook-configs 代码库中的某些配置内容时,需要确保其他开发人员在本地运行 lefthook install ,这样最新的更改将被提取到他们的 hook 中。虽然这需要在团队的沟通中提醒每个人运行 lefthook install ,但最终,这比提交一个更改到十个代码库要容易得多了!